

/image%2F0881799%2F20150718%2Fob_bae49d_980x285-ct.jpg)
LANDESK : Detect and Install Patches within Provisioning
After deploying a new OS in provisioning, or possibly at other times, it is necessary to make sure the device has the most recent patches applied. This can be done using LANDesk's Security and Patch Manager tool through Provisioning. This document will discuss the default method of performing the patching operations, which will be sufficient in some scenarios, and discuss provisioning alternatives to allow for more control of the exact patching behavior.
The options that will be discussed are:
1 - Built-in Patch System action
2 - Option of using an execute file action with command line options
Both of these actions require that an agent is installed before it is executed, or it will fail.
All vulscan.exe parameters that are listed in this document can be found in the following article:
Vulscan Switches for Windows Agents
Built-in Patch System Action and its Behavior
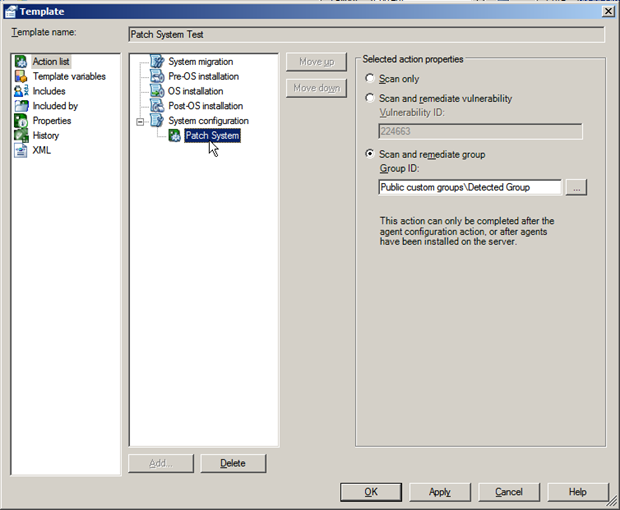
The default action for applying patches to a system in provisioning is called the Patch System action. It is only available in the System Configuration section of provisioning. The primary benefit of using the default action is simplicity. It's a point and click solution. The primary downside is that there isn't a lot of customization that can be done, other than selecting your patch/group of patches to be repaired.
If the default behavior is sufficient for your needs, then it should be utilized. If the default behavior doesn't work how you would like, another option might be best for you.
There are three options for running the action:
1 - Scan only - Will only report vulnerabilities, but not remediate any
Executes the following command:
vulscan.exe /showui=true /AutoRebootTimeout=10 /AutoCloseTimeout=10 /autofix=false /AllowUserCancelScan=false /scan=0234567 /log=c:\ldprovisioning\output.txt

2 - Scan and remediate vulnerability - Can scan for and remediate an individual patch
Executes the following command:
vulscan.exe /showui=true /AutoRebootTimeout=10 /AutoCloseTimeout=10 /autofix=false /AllowUserCancelScan=false /scan=0234567 /log=c:\ldprovisioning\output.txt
The same command as scan only, followed by the following command:
vulscan.exe /showui=true /AutoRebotTimeout=1- /AutoCloseTimeout=10 /PeerDownload=false /AllowUserCancelScan=false /RebootAction=Never /repair /log=c:\ldprovisioning\output.log vulnerability=<vulnerability entered into the field when setting up the action>

3 - Scan and remediate group - Can scan for and remediate a group of patches
Executes the following command:
vulscan.exe /showui=true /AutoRebootTimeout=10 /AutoCloseTimeout=10 /autofix=false /AllowUserCancelScan=false /scan=0234567 /log=c:\ldprovisioning\output.txt
The same command as scan only, followed by the following command:
vulscan.exe /showui=true /AutoRebotTimeout=1- /AutoCloseTimeout=10 /PeerDownload=false /AllowUserCancelScan=false /RebootAction=Never /repair /log=c:\ldprovisioning\output.log group=<group entered into the field when setting up the action>
Execute File Action with Command Line Options
By using the Execute File action you can perform nearly any function within Provisioning, including scanning and remediating systems. There are three options that will be discussed for manually setting up a Patch System action by using the Execute File action directly on Vulscan.exe.
These options are:
1 - Execute vulscan.exe with explicit command line options
2 - Create a provisioning scan and repair settings, and execute vulscan.exe with the option to use those settings
3 - Create a provisioning agent that contains a provisioning scan and repair settings, and execute vulscan.exe without any additional parameters
All available command line options are listed in the document linked at the beginning of this article. For convenience, another link is included here:
Vulscan Switches for Windows Agents
1 - Execute vulscan.exe with explicit command line options
The benefit of this option is that using the command line options you can piece together the exact behavior you want. For example you could easily turn autofix on or off, control reboot behavior, perform certain types of scans, or scans against groups, etc. The downside is that it is probably the most complex to set up. I recommend using options 2 or 3 for convenience.
The action should be configured with settings similar to the following:
Target path and filename:
%%LDMS_LOCAL_DIR%%\..\vulscan.exe
Command line parameters:
Whatever behavior you want from the available options, such as:
/showui=true /rebootaction=never /allowusercancelscan=false /repair group=<group name here>

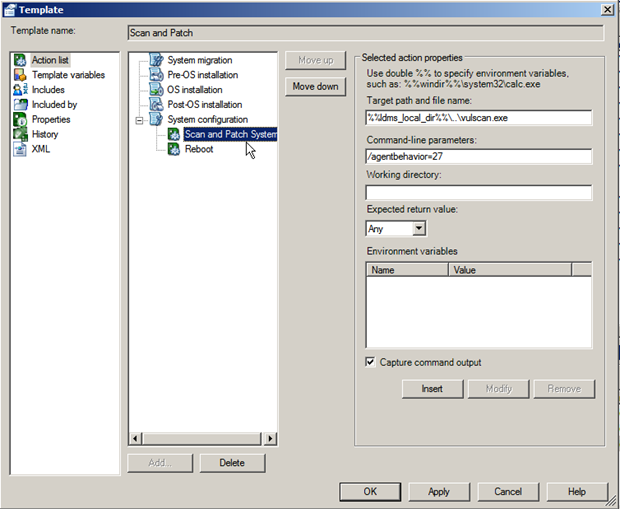
2 - Create a provisioning scan and repair settings, and execute vulscan.exe with the option to use those settings
The benefit of this option is that you have a single command line option to execute that is very simple to use and all behavior can be controlled from within the LANDesk Management Suite Console. Any future changes to behavior can be made in the same way as changes to regular patching behavior. It should be used if using a full provisioning agent is not desired. The following document explains the concept of using a provisioning agent and why it is important, and should be reviewed before determining whether to use this option or not.
Create and use a "provisioning agent" for end to end provisioning
This document will not go over how to create scan and repair settings. For information on setting up patch management refer to the help documentation. Once the scan and repair settings have been created you should set up an Execute File action with the following settings:
Target path and filename:
%%LDMS_LOCAL_DIR%%\..\vulscan.exe
Command line parameters:
/agentbehavior=<Number for the scan and repair settings you created for use with provisioning>
3 - Create a provisioning agent that contains a provisioning scan and repair settings, and execute vulscan.exe without any additional parameters
This option gives the benefits of being the easiest to set up within the provisioning template, as well as the flexibility to change the scan and repair settings within the agent configuration without modifying the template directly. It also incorporates all the benefits of a provisioning agent in general. In most scenarios it will give the most flexibility, the easiest setup, and the most consistent results. A document about using a provisioning agent (also listed above) can be found here:
Create and use a "provisioning agent" for end to end provisioning
To use this option you should create an Execute File action with the following settings:
Target path and filename:
%%LDMS_LOCAL_DIR%%\..\vulscan.exe
Command line options:
none

Conclusion:
Patching systems within a LANDesk provisioning task is a vital step in making sure newly deployed devices are up to the latest security and software standards. By following the steps in this document you, as an administrator, can have the power and flexibility to achieve consistent results in the way that makes most sense for your environment. With LANDesk Provisioning and a little effort you can make sure that your devices are provisioned in a way that is both consistent and easily adaptable to future needs.
/image%2F0881799%2F20140610%2Fob_a8c7fe_logo2.jpg)
Commenter cet article