

/image%2F0881799%2F20150718%2Fob_bae49d_980x285-ct.jpg)
APPV 4.6 SP1 : Sequencing Guide
(A little thanks for you is a big gift for me)
1 Sample Sequencing
This section describes some of the key points to remember during sequencing. To begin, open the Application Virtualization Sequencer and select Create a Package from the Welcome Screen.
1.1 Welcome Screen
The Welcome Screen is new in App-V 4.6 SP1 and provides quick access to the common tasks of creating and upgrading a package.
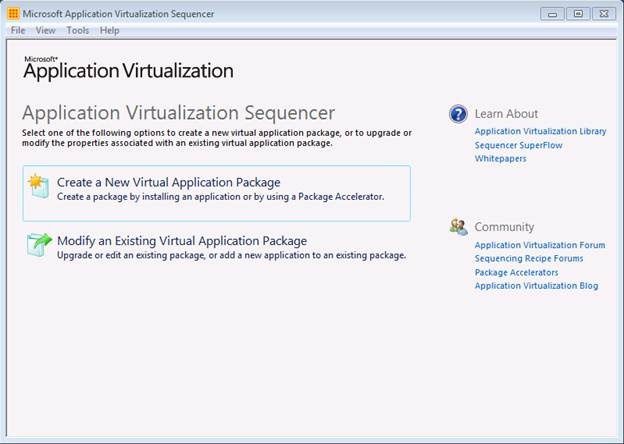
Figure 1: Welcome Screen
Welcome Screen Component
Description
Create a New Virtual Application Package
This option will launch the wizard for creating a new virtual application package.
Modify an Existing Virtual Application Package
This option will launch the wizard for modifying or upgrading an existing virtual application package.
Table 4: Welcome Screen Component Description
1.2 Packaging Method
Creating a package starts with selecting which method to use to create the package. The picture and table below describe the different options that are available.

Figure 2: Packaging Method
Package Method Component
Description
Create Package
Select this option to create a new package from scratch.
Create Package Using a Package Accelerator
Select this option to create a new package from a previously created Package Accelerator.
Table 5: Package Method Component Description
1.3 Prepare Computer
Next, the Sequencer will quickly examine the current operating environment to look for any known process or conditions that are in place (such as if the Sequencer hasn’t been reverted to a clean state after a previous sequencing operation, or there are pending reboots) that might prevent a successful sequencing. Note in the example below that the Sequencer is recommending to stop the Windows Defender service before continuing.

Figure 3: Prepare Computer
1.4 Type of Application
The Sequencer offers choices for the type of application being sequenced in order to determine the steps in the wizard. Select Standard Application for packages that are self-contained (ex: one application, or one suite of applications that are isolated from other software). Select the Add-on or Plug-in or the Middleware options when creating a package that needs to interoperate or when creating packages for Dynamic Suite Composition solutions.

Figure 4: Type of Application
Advanced Options Component
Description
Standard Application
Select this option if sequencing a single application or suiting multiple applications into the same virtual application package.
Add-on or Plug-in
Select this option if sequencing multiple applications in separate virtual application packages and linking them using Dynamic Suite Composition. This option can also be used when packaging Add-ons or Plug-ins for locally installed applications like Internet Explorer.
Middleware
Select this option if sequencing multiple applications in separate virtual application packages and linking them using Dynamic Suite Composition. This option will first create the application package for the middleware component and then create the second virtual application package that will contain the primary application.
Table 6: Type of Application Component Descriptions
1.5 Select Installer
Next, point the Sequencer to the installer for the application being sequenced. An “installer” can be any executable file designed to install the desired application. The Sequencer will automatically launch the installer when it activates monitoring.
Alternatively, you can also select to “Perform a custom installation”. This option causes the sequencing wizard to enter monitoring and then wait for you to finish manually launching any installation tasks. This option is often useful when sequencing applications that may not have an install or setup file such as applications that just copy from a network share.
 Figure 5: Select Installer
Advanced Options Component
Description
Select the installer for the application
This option typically applies to sequencing only a single application using a single installer. Select this option and define the installer file to have the sequencing wizard automatically launch the installer for you.
Perform a custom installation
Select this option to start monitoring and then manually launch your application installer(s). This option behaves similar to previous versions of the Sequencer. It is useful when you have multiple application installers or when there is no application installer.
Table 7: Select Installer Component Descriptions
1.6 Package Name
Next, define the package name and primary virtual application directory.
The Primary Virtual Application Directory is the directory off of the root of the Q: drive that will contain all files for the sequence. Long directory names are supported and the Sequencer will automatically fill in this field as you type the Package Name. Select the “Edit” box to manually set the name of the directory.

Figure 6: Package Name
Advanced Options Component
Description
Virtual Application Package Name
Define a unique name for the virtual application package.
Primary Virtual Application Directory
This is the primary directory that the application will reside in once cached on the client in the Q: (default) drive.
Table 8: Package Name Component Description
1.7 Installation
Next, depending on your earlier choice, the Sequencer will either begin monitoring or launch the installer defined earlier automatically, or you will now manually install the application. You could also click Run and select an installer to have the Sequencer launch the installer for you.
Once installation is complete, select the I am finished installing check box and click next.

Figure 7: Installation
1.7.1 Applications that Require a Reboot
The process of App-V sequencing provides an additional benefit over traditional software deployment and installation. Applications that require a reboot to complete the installation will no longer require the reboot when delivered to the client machines. This is because the Sequencer will monitor the operations that need to be completed during reboot and process them prior to saving the package and prior to delivery to client computers.
For applications that give you the choice to reboot, just click “yes.” The Sequencer will record the reboot tasks that the application has configured and cancel the reboot.
If the application forces you to reboot, the Sequencer will record the reboot tasks that the application has configured and cancel the reboot.
Once you check the “I am finished installing” check box and click Next, the Sequencer will simulate the reboot. That is the sequencing workstation will not actually reboot. The Sequencer will simply process the reboot tasks that the Sequencer has recorded and apply them to the package.
1.8 Configure Software
Many applications have first-run tasks such as accepting license agreements, etc. At this stage, execute the application(s) at least once by selecting the application and clicking the “Run Selected” or “Run All” buttons (multiple executions are recommended to ensure and second-run tasks are executed). Also, it is during this execution that you will make any applicable application configuration changes that the Sequencer will capture.

Figure 8: Configure Software
1.9 Installation Report
The Sequencer now detects common sequencing issues during sequencing. The Installation Report page of the wizard displays diagnostic messages categorized into Errors, Warnings, and Info depending on the severity of the issue. Double click an item in the report to view detailed information about the issue as well as suggestions about how to resolve it. Messages from the system preparation report as well as the installation report are summarized upon completing the package and are saved along with the package in a report.xml file.
Items in the report include:
· Excluded Files
· Drivers
· COM+ System differences
· SxS Conflicts
· Shell Extensions

Figure 9: Installation Report
1.10 Customize
Next you have the choice to stop and save the sequence at this point or to further customize the package before saving the package.
Often, there are other steps left to do such as:
· Splitting the package into feature blocks to reduce the streaming requirement and save bandwidth.
· Customizing the name and version numbers of shortcuts and changing their locations and file-type associations.
· Selecting additional client operating systems that will be permitted to receive this package (the default is the current OS).
· Configuring the name, port, and location for the package for distribution via the App-V Management Server (if applicable).
· Further customizing any virtual registry entries.
If you are satisfied that the package you have sequenced will not benefit from any of the above steps, then selecting “Stop Now” may be appropriate. Otherwise, select “Customize.”

Figure 10: Customize
Advanced Options Component
Description
Stop now
Select this option if you are confident that the application as is requires no additional configuration, and does not require the use of Feature Blocks.
Customize
Is it recommended to select this option if you are sequencing a larger or more complex application suite and/or if intend to use this package on multiple client operating systems.
This option will continue the sequencing process in the same way as previous versions of the Sequencer, allowing you to:
· Edit and create additional shortcuts
· Create Feature Blocks to reduce the amount of traffic used for deployment
· Define which operating systems may run the package
· Customize registry entries
Table 9: Customize Component Descriptions
1.11 Edit Shortcuts
Next, the Sequencer will evaluate all of the applications identified during monitoring. Applications may have to be added or removed from this list, based on what is wanted in the final package. Remember, any application in this list will have an associated OSD file created for launching. Also, with web-based applications it is often required to add Internet Explorer as an application because the web-based application will require Internet Explorer to run properly. Each application can be modified to change the name, icon that it uses, file type associations, and locations for shortcuts on destination computers.

Figure 11: Edit Shortcuts
Clicking the “Edit” button for any shortcut will bring up the options in the following capture (Figure 12) useful for customizing the name and version of the shortcut that will be displayed to the end user as well as the filename for the shortcut (.osd) that will be saved in the sequence.
Clicking the “Add” button will bring up the same option window as the “Edit” button (Figure 12), but the fields will be blank. You would first click the “Browse” button next to the Application Path and select the executable file that the new shortcut will point to. The Icon, Name, Version and OSD file name fields will auto-propagate based on the information within the selected executable. You can then proceed to edit the information to suit your needs.

Figure 12: Edit Shortcut Options
Configure Apps Component
Description
Edit
At this point you can add or remove icons for applications. Additionally, you can edit the file type associations and the icon locations on the client.
Add
Click to create a new application shortcut that was not automatically generated by the Sequencer.
Remove
Use this option to remove any shortcut from the package that you do not want presented to your users.
Table 10: Edit Shortcuts Component Descriptions
1.12 Prepare for Streaming
Feature blocks are designed to optimize the applications for streaming (if applicable), creating a minimum launch threshold to allow larger applications to launch as soon as enough of the package has been downloaded to allow the user to perform his or her typical functions within the application.
This also reduces the total network bandwidth used when launching the application for the first time and saves hard disk space on the client by leaving less-used data on the server until it is specifically called by the user.
Unless you are deploying your virtual application package using System Center Configuration Manager with the Download and Run option or deploying the virtual application packages via the MSI to standalone mode clients, you will be streaming the virtual application package and will likely benefit from splitting your package in to feature blocks.
At the Prepare for Streaming screen, you have the option of splitting your package in to feature blocks.
Select and run each shortcut from the package that you expect the users to execute in their typical day-to-day operations. Then, perform the common tasks that typical users make use of within each particular application in their typical day-to-day operations.
During this process, the Sequencer is monitoring which specific pieces of the packages resources are being executed and including them in Feature Block One. When a user launches the application for the first time, the App-V client will stream and cache just the data within Feature Block One over the network and will launch the application.
Any pieces of the package that was not included in Feature Block One is placed in to Feature Block Two and resides on the server or storage location until specific resources from within Feature Block Two are called by the App-V client. Those pieces are then streamed on-demand and cached on the client.
You also have the option of simply clicking ‘Next’. Doing so without launching any shortcuts will cause the entire virtual application package to be contained within Feature Block One. In this case, the entire contents of the package will be streamed and cached on the App-V client. This is typically done for very small application packages where the idea of streaming the entire package does not cause any network bandwidth concerns.

Figure 13: Prepare for Streaming
Launch Applications Component
Description
Run Selected
Here you will launch an application to ensure functionality. Additionally, any files that are executed during this phase will be tagged as Primary Feature Block. Any remaining files will be tagged as Secondary Feature Block. If you don’t launch any application then all files will be a part of the Primary Feature Block.
Run All
Performs the same operation as the launch component, but launches all identified applications in the package. This is useful when trying to create Primary and Secondary Feature Blocks for a large suite of applications.
Table 11: Prepare for Streaming Component Descriptions
1.13 Target OS
At the Target OS screen, you have the option of configuring the package to be deployable to clients running any operating system or to clients running only specific operating systems.
If you have packaged an application that you know will not run on 64-bit systems, you would make sure to leave all 64-bit OS options deselected. This will ensure that the application will never be delivered to those machines.
If you have an application that will only run on Windows 7 and not Windows XP, you would leave Windows XP deselected to ensure the package is never delivered to those machines.
Applications sequenced on a 32-bit OS are often likely to run on a 64-bit client OS. However, applications sequenced on a 64-bit OS will never run on a 32-bit client OS. Certain applications that are compatible with both 32-bit and 64-bit operating systems may only work if sequenced separately on a 32-bit Sequencer and a 64-bit Sequencer. In this regard, this screen allows you to target two separate packages of the same application to their appropriate client operating systems.

Figure 14: Target OS
1.14 Create Package
At this stage you’re ready to save your package. One easy method of ensuring that the filename and folder you save in are unique is to use the same PACKAGE NAME that you specified in the Package Information wizard.
Be sure to save the package in a new folder named using the package name (example: Desktop\WordViewer2007). Do not save the package in the same folder as the application installer files.

Figure 15: Create Package
Package Deployment
Description
Compress Package
The package SFT file can be compressed during sequencing to reduce the amount of traffic that will be streamed on the network when loading the package. The compression will have a one-time impact to the end client the first time the virtual application is launched, as the client PC will need to decompress the SFT and put the data into the client’s cache. The decompression algorithm is CPU-intensive. The default setting is “No Compression.” If you are concerned about the size of the package and the impact it may have on your network you may select to compress the package.
Table 12: Create Package Component Descriptions
The Completion Report page of the wizard displays diagnostic messages categorized into Errors, Warnings, and Info depending on the severity of the issue. Double click an item in the report to view detailed information about the issue as well as suggestions about how to resolve it. Messages from the system preparation report as well as the installation report are summarized upon completing the package, and are saved along with the package in a report.xml file.

Figure 16: Package Completed
2 Creating a Package Accelerator
Once you have completed sequencing an application, you have the option of creating a Package Accelerator. App-V Package Accelerators assist you in packaging applications easily and automatically without having to manually install the application or follow a step-by-step recipe. The wizard will guide you through the process of creating a package using an App-V Package Accelerator. Behind the scenes, the Sequencer creates a new package from the App-V Package Accelerator and installation media without monitoring the installation of the application. We recommend that you revert your virtual machine or reimage your physical machine after you apply an App-V Package Accelerator. The wizard will also guide you through the process of creating an App-V Package Accelerator.
A Package Accelerator (packagename.CAB) file will contain the following types of files:
· .OSD files
· .SPRJ file
· Manifest file
· Any files created by the app at time of sequencing containing customizations etc. that are not provided by the installation files
· Files necessary for the virtual environment and streaming optimization
To create an App-V Package Accelerator you first need to have placed on the Sequencer the installation files for the application as well as the existing virtual application package for the application.
Supported Installation Media file types can be presented to the Sequencer for creating or using Package Accelerators:
· .MSI
· .ZIP
· .CAB
· Individual files and folders
· NOTE: Self-extracting executable files are not supported. If using this type, you will first need to extract the files and present the folder containing the extracted set-up files to the sequencer.
o Alternatively, at the Installation Files Screen (Figure #18) you can select the option ‘Files installed on local system’. To use this, the application must be already physically installed on the local system.
2.1 Work-flow
· Once you have completed a sequence, click the “Tools” pull-down menu and select “Create a Package Accelerator.”

Figure 17: Tools Menu
· At the Select Package screen, browse to and select the .SPRJ file for the package to use in order to create the Package Accelerator.
· At the Installation Files screen, specify the location of the application’s installation files.
o Select ‘Original installation files’ and browse to and select a root folder that contains all installation files for the application
OR
o Select ‘Files installed on local system’ and browse to and select the folder to which the application was already installed. (Must be installed to its default location).

Figure 18: Installation Files
· At the Review Missing Files screen, the Sequencer will identify and report on any files that do not appear where the application expects to find them. Often many of the files may not actually be needed. In that case, click the box labeled “Remove these files.”

Figure 19: Review Missing Files
· At the Select Files screen, the Sequencer will display all files that have been detected for use in the App-V Package Accelerator. Uncheck the box next to any files that you do not want included in the Package Accelerator.
o Example: The Sequencer has included a large temporary or cache location containing copies of the setup files that you know you do not need included in the package. Removing files such as this can help reduce the size of the overall package.

Figure 20: Select Files
· At the Verify Applications screen, the Sequencer will provide a list of applications that were detected in the package for reference purposes for the engineer who will later create the package from the accelerator. This information is useful for the engineer to know which application installers that will be needed.

Figure 21: Verify Applications
· At the Select Guidance screen, create a .txt file containing any special instructions needed for the engineer to create the package using the App-V Package Accelerator. Enter the location of this file. The App-V Package Accelerator will then display the information to the engineer performing the sequencing later.
Some examples of information to include are:
o Name of original packager for internal reference (if applicable)
o Names and versions of the specific applications included in the package
o Supported platforms
o Prerequisites
o Special instructions or configurations
· At the Create a Package Accelerator screen, select a location to save the Package Accelerator. The Package Accelerator consists of a single .cab file.
· Save this file to the location of the installation media for easy retrieval.
3 Create a package using a Package Accelerator
To create a new virtual application package using an App-V Package Accelerator you will first need to have the application installation files and the Package Accelerator (.cab) file copied to the sequencing VM.
3.1 Work-flow
1. Select Create a New Virtual Application Package from the welcome screen.
2. At the Packaging Method screen, select ‘Create a Package using a Package Accelerator.’
3. At the Select Package Accelerator screen, browse to and select the relevant Package Accelerator .CAB file.
4. At the Guidance screen, read carefully any important information that may be presented to you from the developer of the Package Accelerator. This information can be useful in creating a successful package.
5. At the Select Installation Files screen, browse to and select the root folder containing the installation files for the application.
6. At the Package Name screen, enter a name for the package. By default, the Sequencer will automatically enter the name of the original package that was used to create the Package Accelerator.
7. At the Save the Virtual Application screen, enter any comments relevant to any customizations you will be making to the package (optional) and select the location to save the new package as well as the option whether or not to compress the package.
8. At the Configure Software screen, select the ‘Configure Software’ button to proceed with launching the applications to provide any additional configurations before saving the package.
a. If you are certain that no further configuration is necessary you may select to ‘Skip this step’ and proceed directly to saving the package.
9. At the Run Each Program to manage first-use tasks screen, you can choose to run all or run specific applications to clear any first-use tasks as well as further customize the application.
10. Continue to save the application.
11. Just as earlier in Section 8, upon completion the Sequencer will provide a report detailing any relevant information to the success of the package.
4 Advanced OSD Scripting
In some instances it may be necessary to make modifications to the application to get it to function properly in the App-V environment. One of the most common methods is making modifications to the OSD file to allow certain actions to be performed at a specified time during the execution of the application.
Scripting in the OSD file is an invaluable tool when sequencing / publishing applications. These scripts can be used to setup or alter the virtual environment before an application executes, or can be used to “clean up” the environment after the application terminates. These custom modifications can be made using any text editor or XML editor utility.
It is important to understand the OSD files, and their syntax, prior to using custom scripting. Only experienced sequencing engineers should make custom modifications to the OSD file, and you should always create a backup copy of the original OSD file prior to making any modifications. Placing an incorrect syntax in an OSD file could cause the application to not work properly, or can even prevent the application from appearing at all on the clients.
OSD file: Provides information necessary to launch the application, including the name of the Virtual Application Server from which to stream the application, and any Dynamic Suite Composition dependencies. Each application requires an OSD file. The OSD file is written in an XML format. The major sections are detailed below:
· <SOFTPKG>: This line displays the package’s Globally Unique Identifier (GUID), name and version. Each of these fields must be unique across all published applications.
· <IMPLEMENTATION>: This section tells the Application Virtualization Client "how" to run the virtual application, including what protocol to use when streaming the application, what server to get the application from, whether or not to "terminate" any child processes when the application closes, etc.
· <DEPENDENCY>: This section lists any scripts that must be run prior to launching this application. It also specifies whether a specific version of the App-V Client must be installed on the client to run this application.
· <PACKAGE NAME>: This line lists the name of the package, as specified during sequencing.
· <ABSTRACT>: This section displays any comments that were listed during sequencing. You should list as much information here as necessary to describe the sequencing environment.
· <MGMT_SHORTCUTLIST>: This section displays where the shortcuts will be placed on the client. For example, to place a shortcut on the Start\Programs\Virtual_Applications menu, this would display as "%CSIDL_PROGRAMS%\Virtual Applications."
· <MGT_FILEASSOCIATIONS>: This section lists all of File Type Associations that will be registered on the client, so an application can be launched by double-clicking a file.
A sample OSD file:
Before we talk about scripting here is a generalized look at a typical OSD file.
<SOFTPKG GUID="application GUID" NAME="application name" VERSION="version string">
<IMPLEMENTATION>
<CODEBASE HREF="location“ GUID="package" FILENAME="application“
PARAMETERS=“parameters” SYSGUARDFILE="state file"/>
<OS VALUE="platform"/>...<OS VALUE="platform"/>
<WORKINGDIR>optional working directory</WORKINGDIR>
<VIRTUALENV virtual environment configuration options>
<ENVLIST>optional variables</ENVLIST> <REGISTRY>optional values</REGISTRY>
<POLICIES>optional policies</POLICIES>
<DEPENDENCIES>
<CODEBASE ... MANDATORY="TRUE|FALSE"/>...<CODEBASE ... MANDATORY="TRUE|FALSE"/>
</DEPENDENCIES>
</VIRTUALENV>
</IMPLEMENTATION>
<DEPENDENCY>
<CLIENTVERSION VERSION="4.5.0.0"/> <SCRIPT>optional scripts</SCRIPT>
</DEPENDENCY>
<MGMT_SHORTCUTLIST><SHORTCUT definition>…<SHORTCUT …></MGMT_SHORTCUTLIST>
<MGMT_FILEASSOCIATIONS>
<PROGIDLIST>shell integration</PROGIDLIST><FILEEXTENSIONLIST>FTAs</FILEEXTENSIONLIST>
</MGMT_FILEASSOCIATIONS>
</SOFTPKG>
4.1 OSD Scripts
All scripts must be placed between the <DEPENDENCY> tags within the OSD files. You can choose to refer to an existing script by its file name or you can enter the exact syntax of the commands in the script section.
When developing scripts, the first step is to decide when the script will run. Using the SCRIPT TIMING and EVENT tags, the script can be executed at different times during the virtual application launch.
· Pre Stream: After the user launches the application, but prior to the application blocks streaming to the client workstation and the virtual environment being set-up. An example of a Pre-Stream script might be starting a necessary VPN connection to connect to a server that the application requires.
· Post Stream: After the user launches the application, and after the application blocks stream to the client workstation, but prior to the virtual environment being set-up. An example of a Post-Stream script might be to install a dependent component on the host workstation.
· Pre Launch: After the user launches the application, and after the bits stream to the client workstation, and after the virtual environment has been set-up. Whatever commands are called in a Pre-Launch script occur within the virtual environment. An example of a Pre-Launch script might be to ensure a file exists or a registry key gets added to the virtual environment.
· Post Launch: After the application launches, but prior to the user getting access to the application’s interface. An example of a Post-Launch script might be calling a script to synchronize a folder inside the virtual environment with one that is outside the virtual environment.
· Post Shutdown: After the virtual application has been closed. An example of a Post-Shutdown script might be to reset the workstation back to a clean state to remove any extraneous files that the application itself may have dropped onto the workstation.
Note: There is no Pre-Shutdown script as it would be impossible to know the exact moment before the user closes the application.
Next, the script must define where to run the script. The OSD script can be run in one of two locations: either inside the virtual environment or outside, or on the local operating system outside the virtual application virtual environment. The PROTECT tag is the only XML tag that defines where the script will run, either inside the virtual environment or outside. The two settings for the PROTECT tag are described below:
· TRUE: Allows the script to run within the protected environment. This script placement can be very useful for troubleshooting.
· FALSE: Allows the script to run outside the virtual environment. This script placement can be very effective when files need to be copied locally to a client but there is no need to penetrate the virtual environment.
<SCRIPT TIMING=“PRE” EVENT=“LAUNCH” PROTECT=”TRUE”>
The last two attributes that affect the script operation are TIMEOUT and WAIT. These two attributes define how much time the script will need to wait to completely execute. The TIMEOUT attribute, in seconds, defines how long the client will wait. A value of “0” defines the client will wait indefinitely. The WAIT attribute is still supported in version 4.6, for backward compatibility. A value of TRUE defines that the client should wait for the script to complete before starting the next step in the script. A value of FALSE defines that the client can continue onto the next step without waiting for the current step to complete.
<SCRIPT TIMING=“PRE” EVENT=“LAUNCH” WAIT=”TRUE” TIMEOUT=”0”>
The following sequenced list describes the full application launch and shutdown and when the script events occur. The list also shows whether the virtual environment is loaded and whether or not the script could access the virtual environment.
1. Virtual Application Launch / Shutdown Progression
a. User clicks on program shortcut for a virtual application.
b. Pre-Stream script runs (outside Virtual Environment).
c. Page streams FB1.
d. Post-Stream script runs (outside Virtual Environment).
e. Virtual environment is loaded.
f. Pre-Launch script runs (inside or outside Virtual Environment).
g. The virtual application launches.
h. Post-Launch script runs (inside or outside Virtual Environment).
i. If background streaming is enabled for the application,
FB2 will stream into the client cache in the background.
j. User exits the virtual application.
k. The virtual environment is unloaded.
l. Post-shutdown script runs (outside Virtual Environment).
Note: The client does not support a SHUTDOWN event with Timing of PRE.
Note: Scripts can be written in any language but their language must be installed locally on the client machine. For example, if they are using PERL, the PERL runtime must be locally installed on the client machine.
4.2 OSD: SCRIPTBODY vs. HREF
There are two kinds of scripts, <SCRIPTBODY> and <HREF>, which are described in more detail:
1. HREF – Normally used when executing a single command.
2. SCRPITBODY – Used when needing more complex operations and/or multiple commands to be run.
<SCRIPTBODY>
<HREF>
Can be used to call an executable by searching for the executable in the client’s Path statement.
Can be used to call an executable by searching for the executable in the client’s Path statement.
Uses the “\” as an escape character and as such requires an extra “\” to pass the actual character.
Does not use the “\” as an escape character.
Can be used to pass non executable commands such as the DOS make directory (md). This is actually a part of the command.com.
Cannot be used to pass non-executable commands such as the DOS make directory (md).
When used, the contents of the script are copied to a temporary .bat file on the client’s drive.
Does not create a temporary .bat file but instead executes the contents of the script directly on the client.
When used a DOS window appears on the screen during the execution of the script’s .bat file.
No DOS window appears on the screen unless the process being called is a console application.
<SCRIPTBODY>
<HREF>
Can be used to call an executable by searching for the executable in the client’s Path statement.
Can be used to call an executable by searching for the executable in the client’s Path statement.
Table 13: Scriptbody vs. Href
4.3 <SCRIPTBODY> Examples
Example 1 – ABORTRESULT and SUCCESSRESULT
If ABORTRESULT is specified, the client will check the script's exit code when it completes. If SUCCESSRESULT is specified (and if ABORTRESULT is not or it does not match the script's exit code), the client will check the script's exit code to see if it matches the value in SUCCESSRESULT.
<DEPENDENCY> <SCRIPT TIMING="PRE" EVENT="LAUNCH" PROTECT="TRUE" WAIT="TRUE" TIMEOUT="10" SUCCESSRESULT="1" ABORTRESULT="0">
<SCRIPTBODY>@ if not %COMPUTERNAME% == “SpecialComputer” exit 1 @ exit 0
</SCRIPTBODY>
</SCRIPT>
</DEPENDENCY>
A more detailed explanation of these commands can be found at:
http://support.microsoft.com/kb/930973/en-us
Example 2 – Pre-Launching Command Prompt
<DEPENDENCY>
<SCRIPT TIMING="PRE" EVENT="LAUNCH" WAIT="TRUE" PROTECT="TRUE">
<SCRIPTBODY>cmd.exe</SCRIPTBODY>
</SCRIPT>
</DEPENDENCY>
Example 3 – Embedding Batch File Commands within OSD File
<DEPENDENCY>
<SCRIPT EVENT="LAUNCH" TIMING="PRE" PROTECT="TRUE" WAIT="TRUE">
<SCRIPTBODY>
net use k: \\\\w2k-pdc\\netlogon\n
CALL k:\\usr-w2k.cmd\n
\\\\sfc-App-V\\shr\editini.exe c:\\word\\word.ini "File Locations" TempPath c:\\temp\n
</SCRIPTBODY>
</SCRIPT>
</DEPENDENCY>
Example 4 – Pre-Launching EXE from within the Sequence
<DEPENDENCY>
<SCRIPT TIMING="PRE" EVENT="LAUNCH" WAIT="TRUE" PROTECT="TRUE">
<SCRIPTBODY>%SFT_MNT%\\OfficeXP\\Office10\\proflwiz.exe</SCRIPTBODY>
</SCRIPT>
</DEPENDENCY>
Example 5 – Pre-Launching a Data File (e.g. AVI file) from within the Sequence
<DEPENDENCY>
<SCRIPT TIMING="PRE" EVENT="LAUNCH" WAIT="TRUE" PROTECT="TRUE">
<SCRIPTBODY>%SFT_MNT%\\App\\Data\\Sequencing.avi</SCRIPTBODY>
</SCRIPT>
</DEPENDENCY>
NOTE: In this example, the sequencing.avi launches the locally installed Media Player.
NOTE: A data file (e.g. sequencing.avi) cannot be specified within the FILENAME entry of the CODEBASE tag as shown below.
<CODEBASE
FILENAME="App\Data\Sequencing.avi" NOT ALLOWED
SYSGUARDFILE="App\osguard.cp"
HREF="rtsp://App-V:554/app.sft"
GUID="A2A6D95E-8898-41C0-8020-797B23A1E917"
SIZE="33363442"/>
Example 6 – Pre-Launching a Control Panel Applet within the Sequence
<DEPENDENCY>
<SCRIPT TIMING="PRE" EVENT="LAUNCH" WAIT="TRUE" PROTECT="TRUE">
<SCRIPTBODY>%SFT_MNT%\\App\\CPL\\SYSDM.CPL</SCRIPTBODY>
</SCRIPT>
</DEPENDENCY>
Example 6a – Pre-Launching a Control Panel Applet within the Sequence
<DEPENDENCY>
<SCRIPT TIMING="PRE" EVENT="LAUNCH" WAIT="TRUE" PROTECT="TRUE">
<SCRIPTBODY>
"C:\\Program Files\\Common Files\\System\\Mapi\\1033\\mlcfg32.cpl"
</SCRIPTBODY>
</SCRIPT>
</DEPENDENCY>
4.4 <HREF> Examples
Example 1 – Accessing Local Application
<DEPENDENCY>
<SCRIPT TIMING="PRE" EVENT="LAUNCH" WAIT="TRUE" PROTECT="TRUE">
<HREF>c:\winnt\system32\cmd.exe</HREF>
</SCRIPT>
</DEPENDENCY>
Example 1a – Accessing Batch File via UNC
<DEPENDENCY>
<SCRIPT TIMING="PRE" EVENT="LAUNCH" WAIT="TRUE" PROTECT="TRUE">
<HREF>\\SRV_NAME\NT_SHR\PRE_SCRIPT.CMD</HREF>
</SCRIPT>
</DEPENDENCY>
NOTE: HREF tag cannot be used with %SFT_MNT% or to launch EXE from within virtual environment.
4.5 <PARAMETERS> Examples
The PARAMETERS attribute is used to provide command line arguments to the FILENAME attribute. The FILENAME attribute points to the location of the program to execute when launching the virtual application. An example is placing filename in the PARAMETERS attribute, like a database file that will be opened when the application is launched.
NOTE: The PARAMETERS tag will not support environment variables (e.g. %SFT_MNT%).
Example 1 – Generic Example
<CODEBASE
FILENAME="\ABCD\EXECUTE\Z_RUN.EXE"
PARAMETERS="FORM=MRF01 LANG=ENG ZENV=X_POINT_CHAR"
SYSGUARDFILE="ACBS\osguard.cp"
HREF="rtsp://hercules:554/ACBS_V2.sft"
GUID="BD9AF94E-4A8E-415D-B57F-54A454911FAA"
SIZE="648019522"/>
Example 2 – Launching Data File via a Relative Path
<CODEBASE
FILENAME="App\WordEditor\wordpad.exe"
PARAMETERS=" ..\Data\cli.doc"
SYSGUARDFILE="App\osguard.cp"
HREF="rtsp://App-V:554/app.sft"
GUID="A2A6D95E-8898-41C0-8020-797B23A1E917"
SIZE="33363442"/>
NOTE: ‘..\Data\cli.doc’ is located in the following location within the sequence:
%SFT_MNT%\App\Data\cli.doc
4.6 <WORKINGDIR> Examples – Specifying a Working Directory
The WORKINGDIR tag defines where to look for filenames that are not given a full path as in Windows. In the first example below, it is used make the C:\temp directory the default location to look for files if a referenced file name has no path.
Example 1
<IMPLEMENTATION>
<WORKINGDIR>C:\temp</WORKINGDIR>
<CODEBASE HREF="rtsp://ds1-soft1:554/np_ecj.sft?Customer=Sequencer"
FILENAME="np_ecj\notepad.exe" PARAMETERS="cjm.txt"
GUID="D47C0A23-32CF-11D6-990A-00A0CC6413D5"/>
<OS VALUE="WinXP"/>
</IMPLENENTATION>
Example 2
<IMPLEMENTATION>
<WORKINGDIR>C:\program files\internet explorer</WORKINGDIR>
<CODEBASE HREF="rtsp://ds1-soft1:554/np_ecj.sft?Customer=Sequencer"
FILENAME="np_ecj\notepad.exe" PARAMETERS="cjm.txt"
GUID="D47C0A23-32CF-11D6-990A-00A0CC6413D5"/>
<OS VALUE="WinXP"/>
</IMPLENENTATION>
Example 3 – Example with Variable
<IMPLEMENTATION>
<WORKINGDIR>%SFT_MNT%\App\Data</WORKINGDIR>
<CODEBASE HREF="rtsp://ds1-soft1:554/np_ecj.sft?Customer=Sequencer"
FILENAME="np_ecj\notepad.exe" PARAMETERS="cjm.txt"
GUID="D47C0A23-32CF-11D6-990A-00A0CC6413D5"/>
<OS VALUE="WinXP"/>
</IMPLENENTATION>
4.7 <REGISTRY> Examples – Registry Customizations
<IMPLEMENTATION>
<CODEBASE … />
<VIRTUALENV>
<REGISTRY>
<REGKEY HIVE="HKLM" KEY="Software\Test">
<REGVALUE REGTYPE="REG_SZ" NAME="string">Holas</REGVALUE>
<REGVALUE REGTYPE="REG_DWORD" NAME="dword">5051</REGVALUE>
<REGVALUE REGTYPE="REG_BINARY" NAME="hex">50,51,52</REGVALUE>
<REGVALUE REGTYPE="REG_SZ">Value of Default Key</REGVALUE>
</REGKEY>
</REGISTRY>
</VIRTUALENV>
</IMPLENENTATION>
4.8 Launching Local Applications
Using the FILENAME attribute, the OSD file for an application does not have to open an executable within the virtual environment. In the case of Web add-ins like Microsoft Silverlight, the FILENAME attribute would be pointed to Internet Explorer. There are two examples listed below of launching local applications.
NOTE: The PARAMETERS tag will not support environment variables (e.g. %SFT_MNT%).
Example 1 – Launching Application that is local (not part of the Sequence)
<CODEBASE
FILENAME="C:\Program Files\Internet Explorer\iexplore.exe"
SYSGUARDFILE="App\osguard.cp"
HREF="rtsp://App-V:554/app.sft"
GUID="A2A6D95E-8898-41C0-8020-797B23A1E917"
SIZE="33363442"/>
<VM VALUE="Win32">
<SUBSYSTEM VALUE=”Windows”/>
</VM>
<CODEBASE
FILENAME=" C:\Program Files\Windows Media Player\wmplayer.exe"
PARAMETERS=" q:\app\data\sequencing.avi"
SYSGUARDFILE="App\osguard.cp"
HREF="rtsp://App-V:554/app.sft"
GUID="A2A6D95E-8898-41C0-8020-797B23A1E917"
SIZE="33363442"/>
<VM VALUE="Win32">
<SUBSYSTEM VALUE=”Windows”/>
</VM>
NOTE: C:\Program Files\Windows Media Player\wmplayer.exe is a local application.
4.9 Setting Environment Variables
Using these steps, an environment variable can be set which could be used by the application in the virtual environment. In this example, the system PATH variable is appended by the Mount path (for eg. Q:) and Visual Studio path. Hence, the application would use this updated PATH environment variable when required.
<VIRTUALENV>
<ENVLIST>
<ENVIRONMENT VARIABLE="PATH">%PATH%;%SFT_MNT%\vs2005\Microsoft SDK\bin\.;</ENVIRONMENT>
</ENVLIST>
</VIRTUALENV>
4.10 Launching Application via Non-Default Provider Policy
During installation of the App-V Infrastructure, a Default Provider Policy is created and assigned usage permissions. Provider policies can be created and modified to affect the authentication, access permissions of virtual applications, and licensing. Multiple provider policies can be created so that one is used for applications where no license enforcement is needed and another where license enforcement is enabled. In this scenario, applications that need to use a provider policy that is not the default must have the OSD file modified. The following describes the change to the OSD file for a non-default provider policy (in bold), where Sales is the name of the non-default provider policy.
<CODEBASE
FILENAME="Photoshp\Photoshop.exe"
SYSGUARDFILE="Photoshp\osguard.cp"
HREF="rtsp://appvserver:554/adobephotoshop70.sft?Customer=Sales"
GUID="FE72DDCD-6E80-4ABE-8E82-8208A134CB34"
SIZE="178299260"/>
4.11 Running an Application as a CONSOLE application
THE SUBSYSTEM tag defines the type of application defined in the FILENAME attribute that will be run with two possible elements (windows or console) to define the type of application (windows=windows and console=dos) being executed. In this example, the OSD is describing that the application is a 16-bit DOS application. The values for the VMVALUE tag are Win16, Win32, and Win64 and are case sensitive.
<OS VALUE="WinXP"/>
<OS VALUE="Win2003TS"/>
<OS VALUE="WinVista"/>
<OS VALUE="Win2008TS"/>
<OS VALUE="Win7"/>
<OS VALUE="WinXP64"/>
<OS VALUE="Win2003TS64"/>
<OS VALUE="WinVista64"/>
<OS VALUE="Win2008TS64"/>
<OS VALUE="Win764"/>
<OS VALUE="Win2008R2TS64"/>
<VIRTUALENV>
<ENVLIST/>
</VIRTUALENV>
<VM VALUE="Win16"> Can also be “Win32” or “Win64” WARNING! VM Values are case sensitive.
<SUBSYSTEM VALUE="console"/>
</VM>
</IMPLEMENTATION>
4.12 OSD XML Syntax Check
To check the XML format of an OSD file, change the .OSD file extension to .XML and drop the .XML file into an Internet Explorer window. If there are any open or missing tags the file will not be displayed.
Note: XML file editors such as XML Notepad can also be used to check XML file format.
Example XML file syntax display: <?xml version="1.0" standalone="no" ?>
- <SOFTPKG GUID="26998703-328D-41DE-A256-5AFACD27ED08" NAME="WinZip"
VERSION="90">
- <IMPLEMENTATION>
<CODEBASE
HREF="rtsp://ntlabsg01:554/Winzip_Winzip_901_MNT/Winzip_Winzip_901_
MNT.sft" GUID="A9800C2A-E9ED-4711-B90C-808D6DD0AABC"
FILENAME="Winzip.v1\WINZIP32.EXE" PARAMETERS=""
SYSGUARDFILE="Winzip.v1\osguard.cp" SIZE="6225393" />
<OS VALUE="WinXP" />
<OS VALUE="WinVista" />
<OS VALUE="Win7" />
<OS VALUE="Win2003Svr" />
<OS VALUE="Win2003TS" />
<OS VALUE="Win2003TS64" />
<OS VALUE="Win2008TS" />
<OS VALUE="Win2008TS64" />
<OS VALUE="Win2008R2TS64" />
<OS VALUE="WinXP64" />
<OS VALUE="WinVista64" />
<OS VALUE="Win764" />
- <VM VALUE="Win32">
<SUBSYSTEM VALUE="windows" />
</VM>
- <VIRTUALENV>
<ENVLIST />
</VIRTUALENV>
</IMPLEMENTATION>
- <DEPENDENCY>
<CLIENTVERSION VERSION="2.0.5.0" />
</DEPENDENCY>
<SUITE NAME="Winzip_Winzip_901_MNT" />
<TITLE />
<ABSTRACT>Win XP Sp1, IE 6.0 Seq Build 300</ABSTRACT>
- <MGMT_SHORTCUTLIST>
<SHORTCUT LOCATION="%CSIDL_STARTMENU%" WORKINGDIR=""
DISPLAY="WinZip" ICON="%SFT_MIME_SOURCE%/WinZip90.ico" />
<SHORTCUT LOCATION="%CSIDL_DESKTOPDIRECTORY%" WORKINGDIR=""
DISPLAY="WinZip" ICON="%SFT_MIME_SOURCE%/WinZip90.ico" />
</MGMT_SHORTCUTLIST>
</SOFTPKG>
source: ALL APPV Microsoft Documentations
TIPS:
Test et/ou streamling des applications:
Pas de runall sinon elles se lancent toutes en même temps:
Il suffit que 2 applications lance un chargement de composant
Et non seulement la 2nde plantera mais son chargement sera incomplet
Installation de l’application:
INSTALLER DANS Q:\<nom_du_package>
/image%2F0881799%2F20140610%2Fob_a8c7fe_logo2.jpg)
Commenter cet article