

/image%2F0881799%2F20150718%2Fob_bae49d_980x285-ct.jpg)
Packaging with AdminStudio Repackager
Packaging automates the installation of applications by creating a single installation file.
Indeed, in business, it is not uncommon for an application to be a set of actions, requiring the follow-up of a sometimes very long and complex procedure.
Among these actions, there may be for example the installation of specific registry keys, environment variables, or the registration of DLL. This list is not exhaustive.
A "package" avoids all these manual operations but also to ask a tool (a scheduler) to deploy the application by feeding the tool with this package.
AdminStudio (formerly installshield) is a unique solution for application packaging and virtualization, Windows migrations and reliable software deployment.
Here is an example of the Repackager process. I am going to use Firefox as an example. This is a simple demo, but it will illustrate all of the features of the program. I will use the snapshot method to capture the installation. After install, I will set a bookmark that will persist into the MSI. After capture, I will compile it into an MSI, reset my VM to a snapshot, and install the MSI.
When you first open Repackager, you are presented with this screen. We want to capture an installation, so we select “Capture an Installation Using Repackaging Wizard”.

Next, you are presented with this screen. This is where you tell it if you want to use Installation Monitoring or Snapshot. Since I want to set a bookmark in my Firefox install, I am going to select snapshot

On the next screen, I select multiple steps. The single step process is pretty much the same thing as installation monitoring, so we will not be able to customize Firefox. Once we analyze the system status, the second option, “Analyze system status changes”, will be selectable.

When we click “Next”, the system analysis will begin. This process can take some time, depending on your system. After the analysis is complete, you get this screen:

When you click Finish, the wizard goes away. This is where we install our application. I am not going to go through the Firefox install process, but I did use all of the defaults.

I am now going to open Firefox and set a bookmark.

While doing this, it also took care of initializing and authorizing any plugins. It also performed the import of IE settings.
Now that I have my configured application, I am going to launch the Repackager again. I select the “Capture an Installation Using Repackaging Wizard” option again. Select “Snapshot” again for the capture type, and you’re presented with this screen:
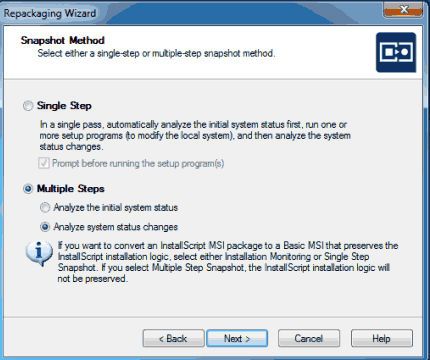
As you can see, the analyze system option is now selected. Just click “Next” on this screen.
Next is the product information page. Fill in these values and click “Next”. Note that the “Product Name” and “Company Name” options are required. These fields define their corresponding MSI property fields.

Keep the default package location on the next screen and click “Start”. Repackager now analyzes your system. Again, this process can take a few minutes. When it is done, click the “Finish” button. Repackager now launches the project.

This set of screens is where we can go through and exclude files, registry keys, and INI file settings. With this particular example, there were no files/folders that need to be excluded. Here is a screenshot of what I am excluding from the registry section:

As you can see, even with a simple installation, there were a lot of erroneous registry keys that the system captured.
Once you have gone through everything and excluded the bad data, we need to compile this into an MSI. You can do that by clicking the “Build” icon in the toolbar:

This constructs the MSI and saves it to “C:\Packages\MSI_Package”. You are looking for the file called “Firefox.msi” in this directory. Once you have the MSI, you can import it into SCCM, Group Policy, or whatever deployment system you choose.
After I built the MSI, I reverted my VM back to the snapshot and installed my MSI. Before reverting your VM, be sure that you copy the ENTIRE Packages directory off of the VM. You will need the entire directory (not just the MSI) to make any further changes.

Here is a screenshot of the Firefox windows, complete with my custom bookmark:

That's all
Enjoy!
/image%2F0881799%2F20140610%2Fob_a8c7fe_logo2.jpg)
Commenter cet article